SIRSTUDIO · Realtime Sky Builder documentation · sirstudiotools.com
Documentation / Realtime Sky Builder
Realtime Sky Builder documentation
Realtime Sky Builder gives your Unreal level a complete sky, clouds and weather, all driven from one panel, the Studio. Pick one of 16 Quick looks, adjust it page by page, and save the result as your own look.
Before you start#
You need two built-in plugins enabled: Niagara and Editor Scripting Utilities.
- Try it first in the demo. Open Demo/Maps/StartHere: a large ground with a weather-reactive material and demo cameras.
- Editor and runtime. The Studio is an editor tool. The Sky Rig and Weather Rig it places also work in Play and in packaged builds.
Open the Studio#
The Studio is an Editor Utility Widget you open once and dock beside your viewport.
- Open the Content Drawer (Ctrl+Space).
- Go to Content › RealtimeSkyBuilder.
- Right-click EUW_RSB_Studio.
- Choose Run Editor Utility Widget, then dock the panel next to your viewport.

Turn on Realtime in the viewport so the sky and weather update while you edit. In a level with no sky yet, click Build sky: it creates a linked Sky Rig and Weather Rig. There is one pair per level.
The Studio at a glance#
The header links the Studio to your rigs, the rail on the left switches pages, and the page itself fills the rest.
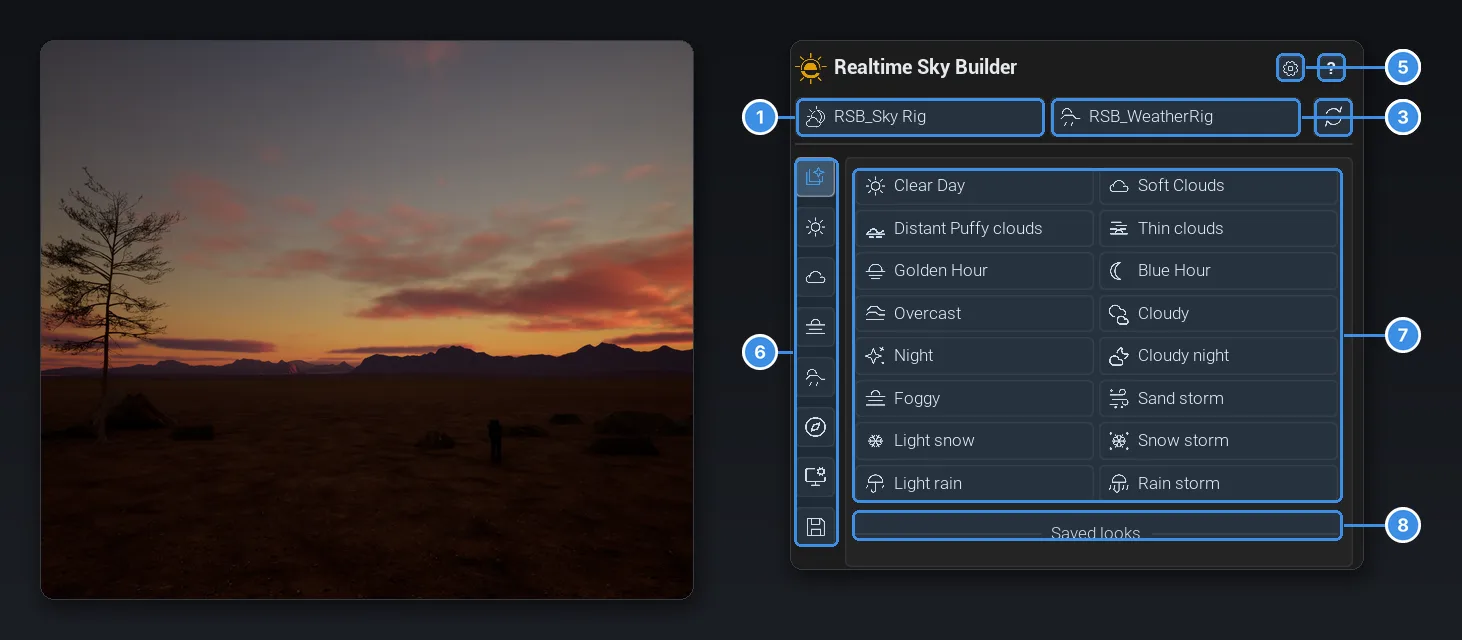
| # | Control | What it does |
|---|---|---|
| 1 | Sky Rig | Selects the level’s Sky Rig and shows it in Details |
| 2 | Weather Rig | Selects the Weather Rig (rain, snow and local fog) |
| 3 | Refresh | Links the Studio to the rigs in the level again |
| 4 | Configure UI | Shows drag handles to reorder the navigation; the order is saved per user |
| 5 | Help | Opens the online documentation |
| 6 | Navigation | Quick looks, Sun/Moon, Clouds, Atmosphere, Weather & effects, Location & Time, Quality, Save look |
| 7 | Quick looks | 16 complete skies, one click each |
| 8 | Saved looks | The looks you save yourself |
Hover any control for a short description. On a narrow panel, buttons show icons only.
Quick looks#
One click applies a complete sky: sun, moon and stars, clouds, atmosphere, weather and wet or snowy ground.
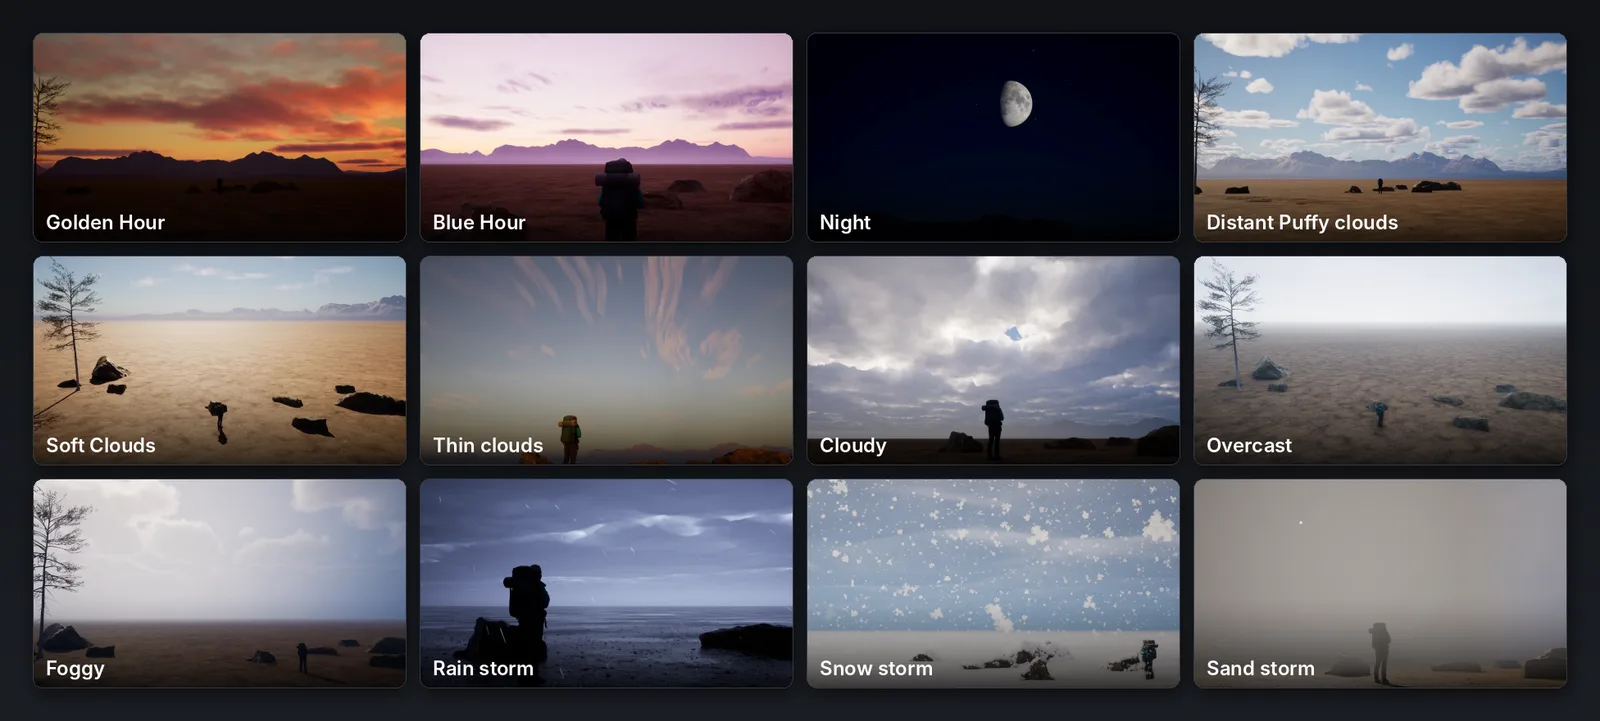
- Looks blend instead of snapping. The blend time is Look Fade Seconds on the Sky Rig (Details › Quick looks). Set it to 0 for an instant switch.
- Every Quick look uses High quality, so you start from the best result.
- A look is a starting point. Everything it sets stays editable on the other pages. Editing during a blend stops the blend and keeps your change.
- To change a Quick look itself, open its Data Asset in Data/Looks/QuickLooks (DA_RSB_QuickLook_*), edit it and save. The button uses the new values on its next click.
Sun & Moon#
Three tabs control the sky lights: Sun, Moon and Night Sky.
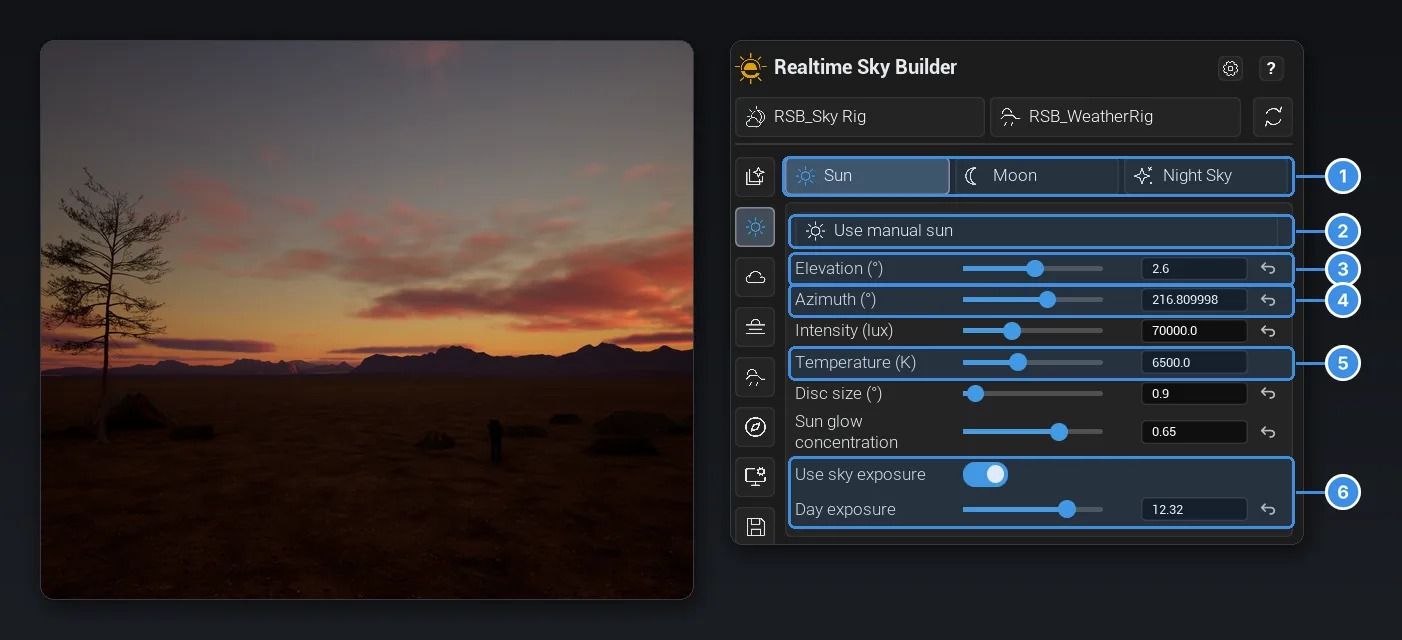
| # | Control | What it does |
|---|---|---|
| 1 | Tabs | Switch between Sun, Moon and Night Sky |
| 2 | Use manual sun | Place the sun yourself with Elevation and Azimuth. When Location & Time is on, it places the sun instead |
| 3 | Elevation | Height of the sun above the horizon, in degrees |
| 4 | Azimuth | Compass direction of the sun; shadows and sky colour follow |
| 5 | Temperature | Warmer (lower K) or cooler sunlight |
| 6 | Sky exposure | Use sky exposure fixes the exposure; Day exposure sets its value |
Intensity, Disc size and Sun glow concentration fine-tune the sunlight and the glow around the sun.
The Moon and the stars switch on and off independently. Night, Cloudy night and Blue Hour turn both on.

| # | Control | What it does |
|---|---|---|
| 1 | Moon | Shows or hides the moon |
| 2 | Moon elevation and azimuth | Where the moon sits in the sky |
| 3 | Moon light | How much light the moon casts, in lux |
| 4 | Moon phase | The moon’s phase, from 0 to 1 |
| 5 | Night exposure | Exposure for night scenes |
| 6 | Stars | Shows or hides the stars |
| 7 | Star brightness, density, rotation | How bright and how many stars, and how the star field is turned |
| 8 | Milky Way | Strength of the Milky Way band |
Clouds#
Start from a cloud type, then shape it. The Cloud type tab sets the main layer; Cloud Motion moves it.
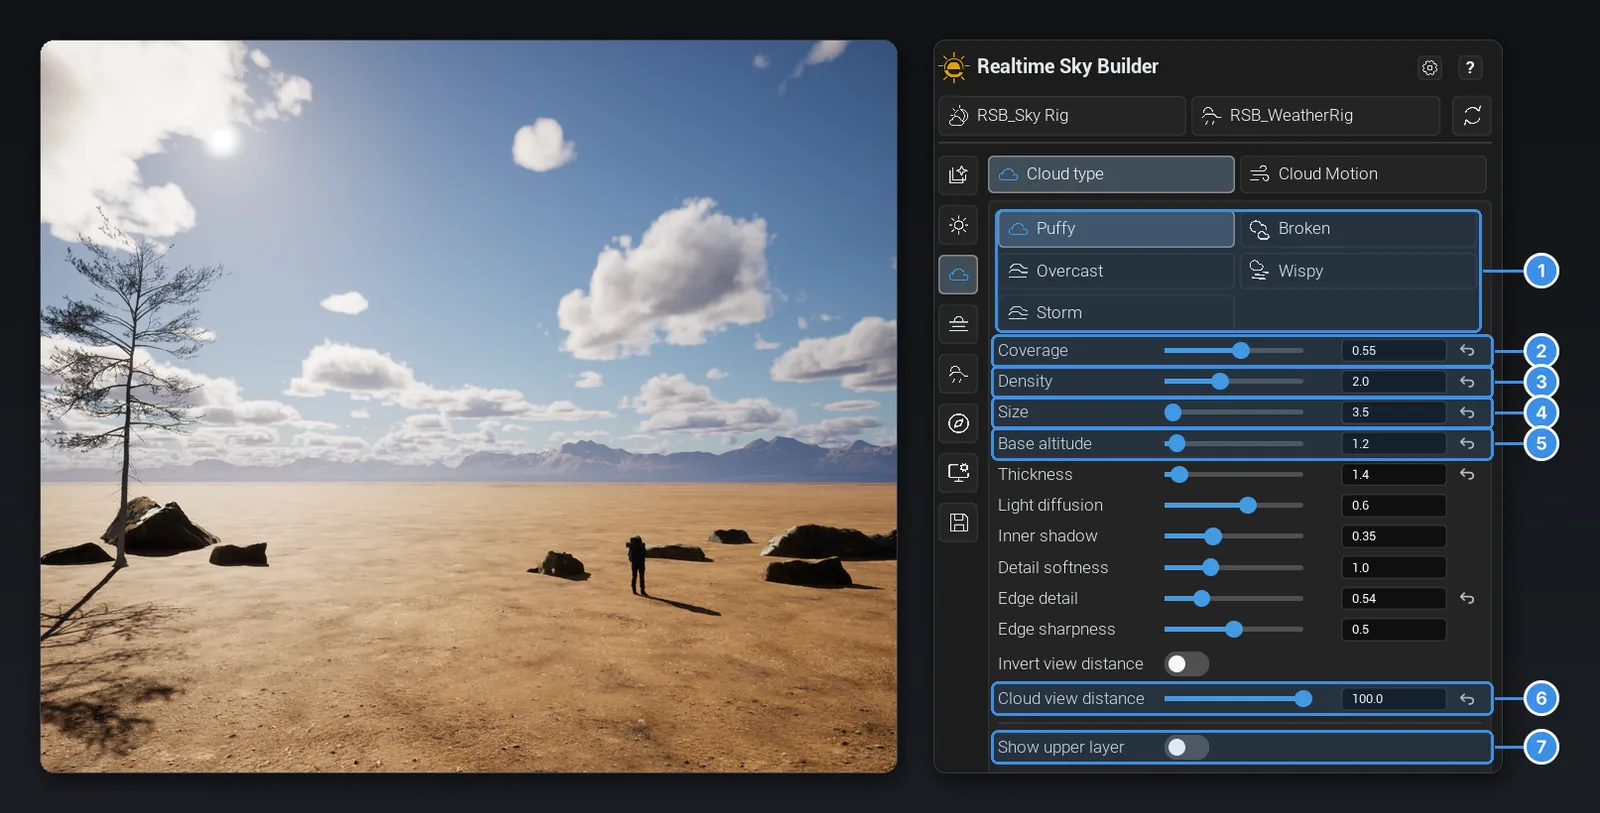
| # | Control | What it does |
|---|---|---|
| 1 | Cloud type | Puffy, Broken, Overcast, Wispy or Storm. Each is a preset for the controls below |
| 2 | Coverage | How much of the sky is covered |
| 3 | Density | How thick and opaque the clouds are |
| 4 | Size | Scales the cloud shapes |
| 5 | Base altitude | Height of the cloud bottoms |
| 6 | Cloud view distance | How far away clouds are still drawn |
| 7 | Show upper layer | Adds a second, high cloud layer |
Thickness, Light diffusion, Inner shadow, Detail softness, Edge detail and Edge sharpness refine the shapes and how light passes through them. Click any value to type an exact number, then press Enter.
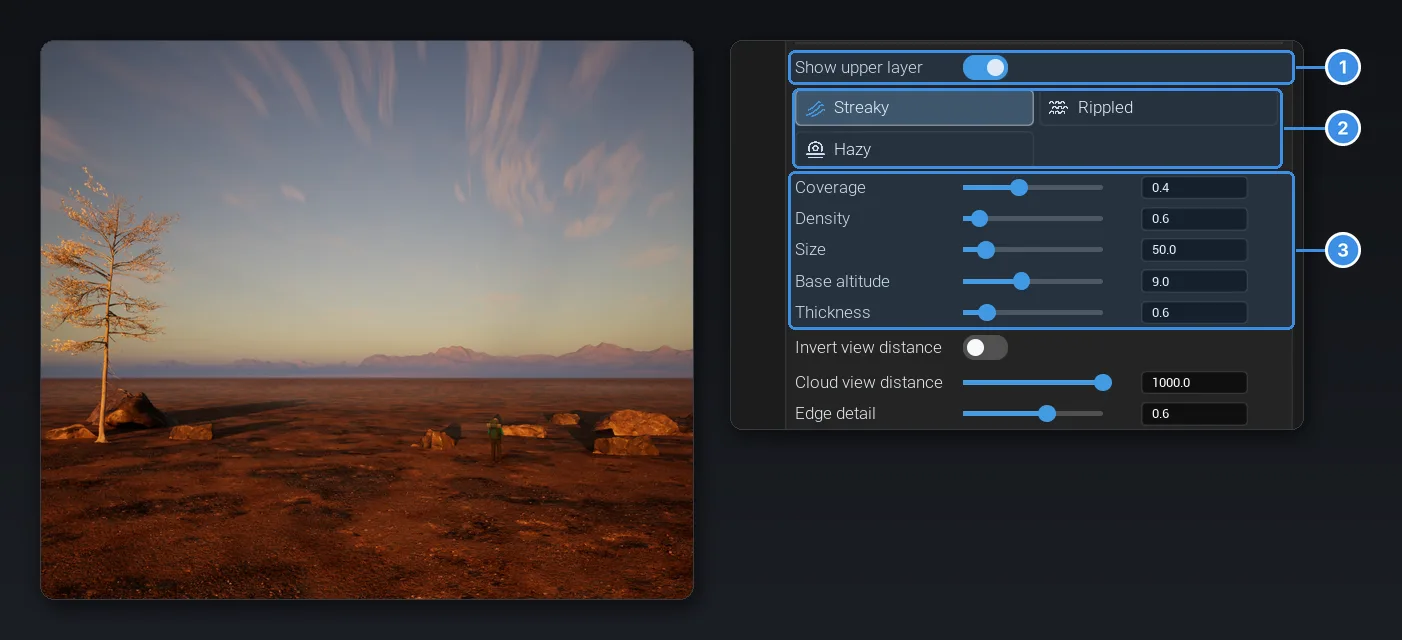
Upper layer. Turn on Show upper layer (1), pick Streaky, Rippled or Hazy (2), then set its own coverage, density, size, altitude and thickness (3).
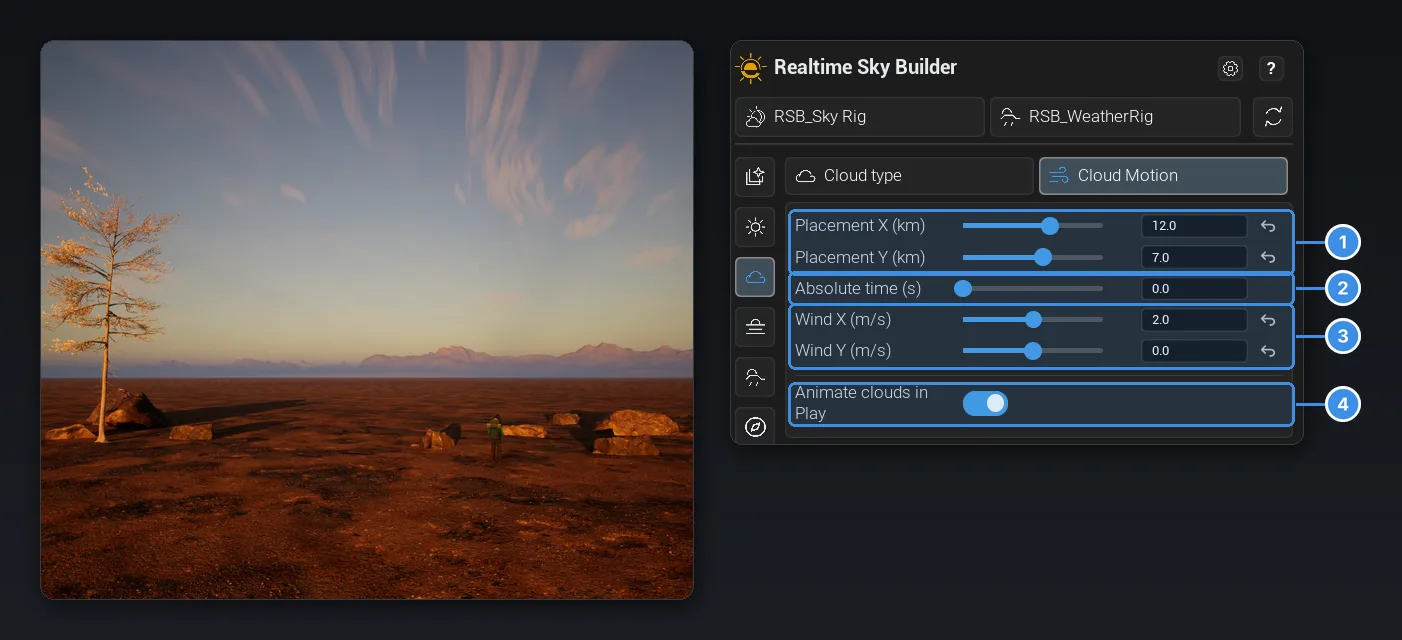
Cloud Motion. Placement X/Y slides the cloud field (1). Absolute time moves the clouds through their evolution; key it in Sequencer for repeatable shots (2). Wind X/Y sets direction and speed (3). Animate clouds in Play is on by default; turn it off when Sequencer keys Absolute time (4).
Atmosphere#
The air between you and the horizon: sky colour, haze and height fog.

| # | Control | What it does |
|---|---|---|
| 1 | Sky light intensity | Ambient light from the sky |
| 2 | Rayleigh scattering | The blue of the clear sky |
| 3 | Haze / Mie scattering | Aerosol haze and the glow around the sun |
| 4 | Fog density | How thick the height fog is |
| 5 | Fog layer height | How high the fog reaches, in metres |
| 6 | Fog tint | The colour of the fog |
Weather & effects#
Two tabs: Particles for what falls from the sky, Surfaces for what it does to the ground.
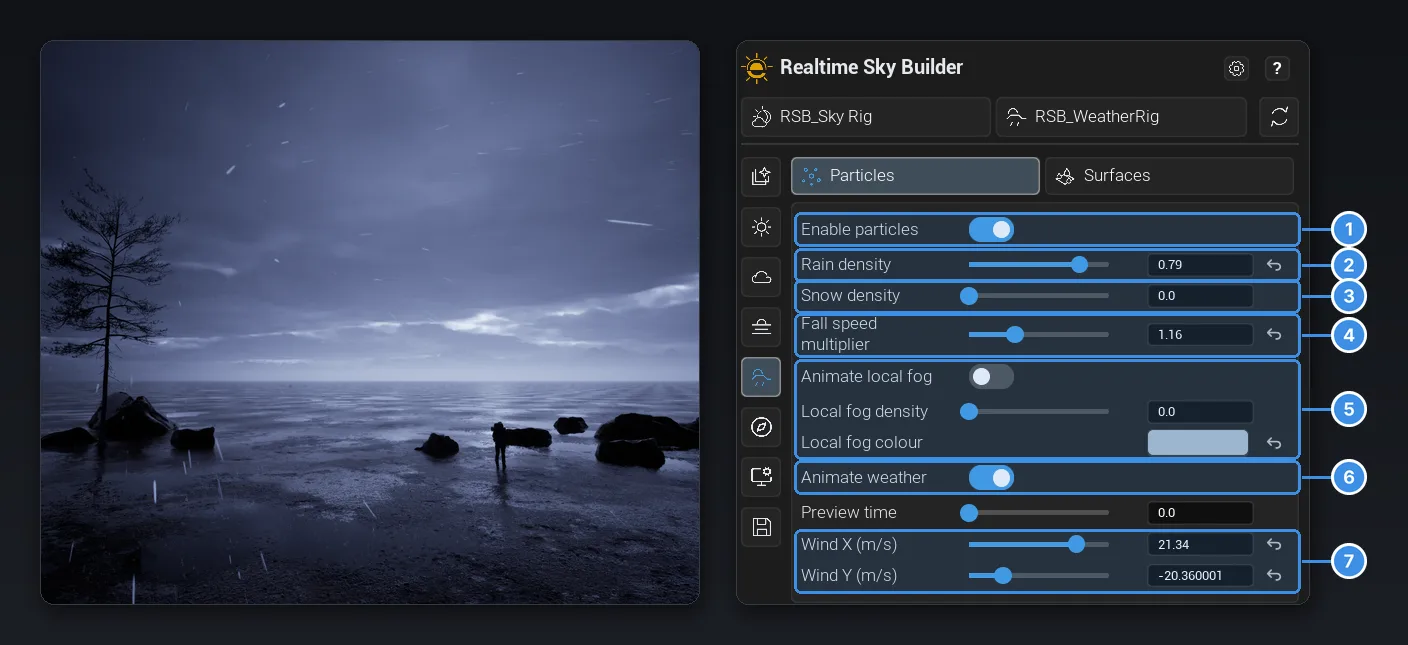
| # | Particles | What it does |
|---|---|---|
| 1 | Enable particles | Turns rain, snow and local fog on |
| 2 | Rain density | How heavy the rain is |
| 3 | Snow density | How heavy the snow is |
| 4 | Fall speed multiplier | Faster or slower drops and flakes |
| 5 | Local fog | Animate, density and colour of the low local fog |
| 6 | Animate weather | Plays the particles in the editor. Turn it off and use Preview time to hold one moment |
| 7 | Wind X/Y | Pushes the rain and snow, in m/s |
Rain and snow are lit by the sun and moon, so they turn warm at golden hour. They don’t fall under roofs, and rain splashes on the ground. In the editor they follow the viewport camera while the Studio is open and the viewport is in Realtime.
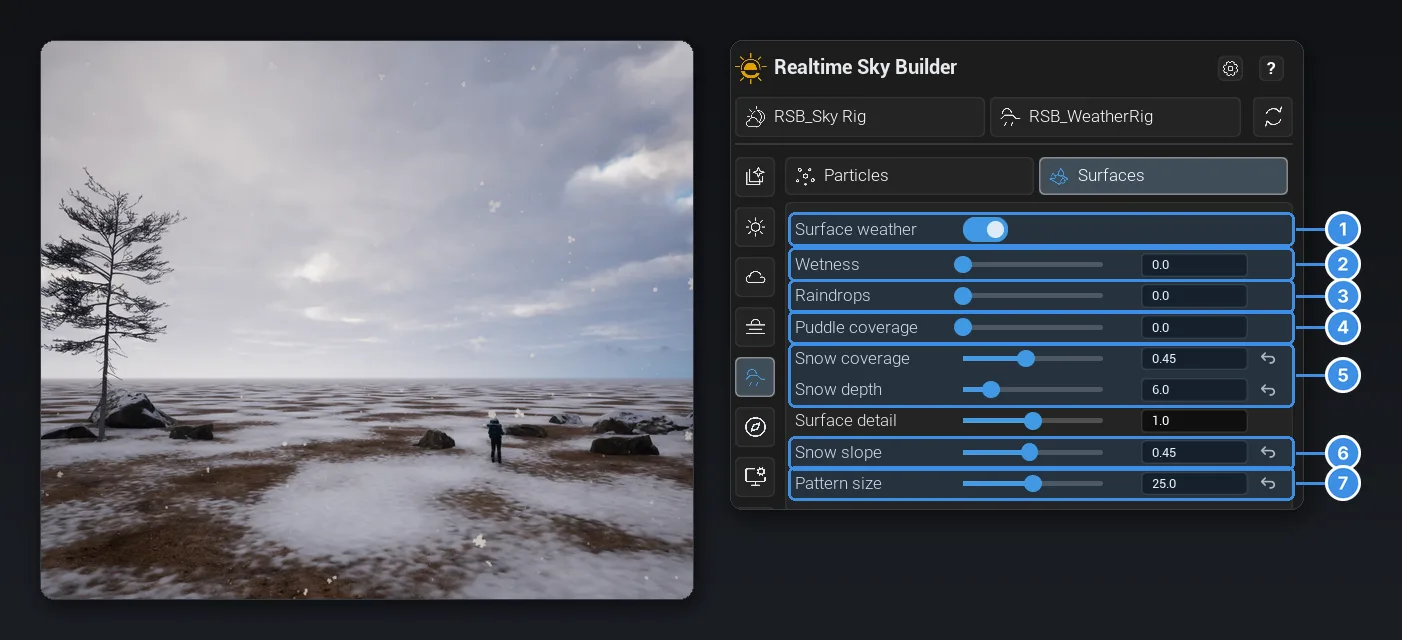
| # | Surfaces | What it does |
|---|---|---|
| 1 | Surface weather | Master switch for wet and snowy ground |
| 2 | Wetness | Darkens the ground and adds shine |
| 3 | Raindrops | Ripples on wet surfaces |
| 4 | Puddle coverage | Standing water in low areas |
| 5 | Snow coverage and depth | How much snow, and how thick, in cm |
| 6 | Snow slope | The steepest slope that still holds snow |
| 7 | Pattern size | Size of the drift and puddle pattern, in metres |
Surfaces only show on materials that use MF_RSB_WeatherSurface (see In your own project below).
Location & Time#
Turn this on to place the sun from a real place, date and time instead of by hand.
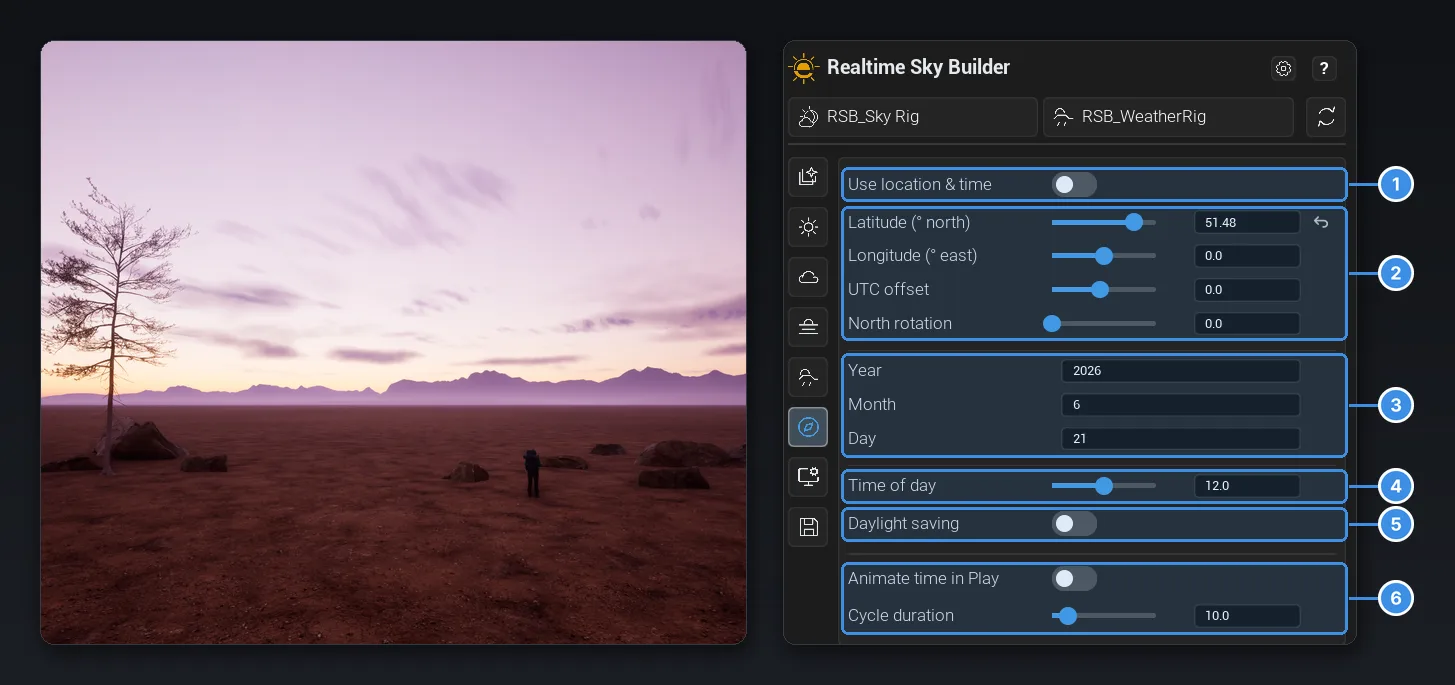
| # | Control | What it does |
|---|---|---|
| 1 | Use location & time | The sun follows the location, date and time below |
| 2 | Latitude, Longitude, UTC offset, North rotation | Where in the world the level is. North rotation turns the compass to match your level (+X is north at 0) |
| 3 | Year, Month, Day | The date, which sets the sun’s path and day length |
| 4 | Time of day | Local time, in hours |
| 5 | Daylight saving | Adds the summer-time hour |
| 6 | Animate time in Play | Runs a day cycle in Play; Cycle duration sets how long it takes |
Quality#
Quick looks start at High. Step down only when you need the frame time back.
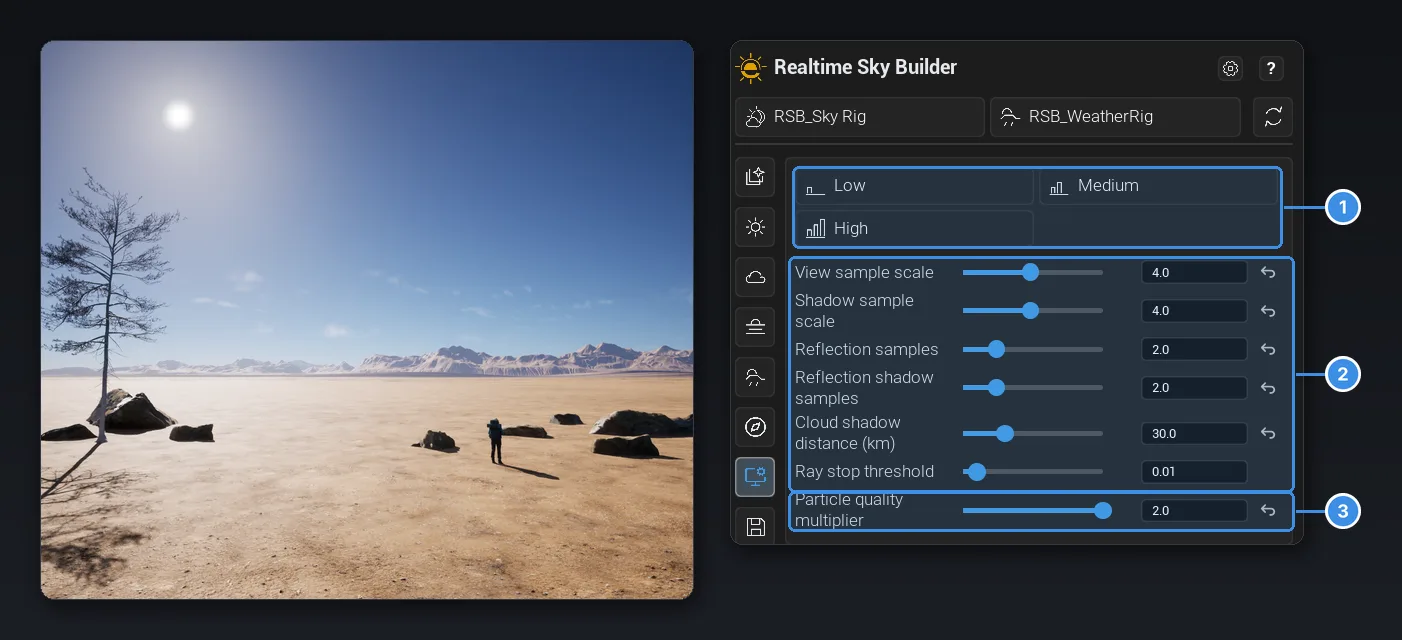
| # | Control | What it does |
|---|---|---|
| 1 | Low, Medium, High | Presets for cloud sampling, shadows and particles |
| 2 | Sample and shadow settings | View and shadow sample scale, reflection samples, cloud shadow distance and ray stop threshold, for fine-tuning cost against quality |
| 3 | Particle quality multiplier | Detail of the rain and snow particles |
Save your own looks#
Save the current sky as your own look and bring it back with one click.
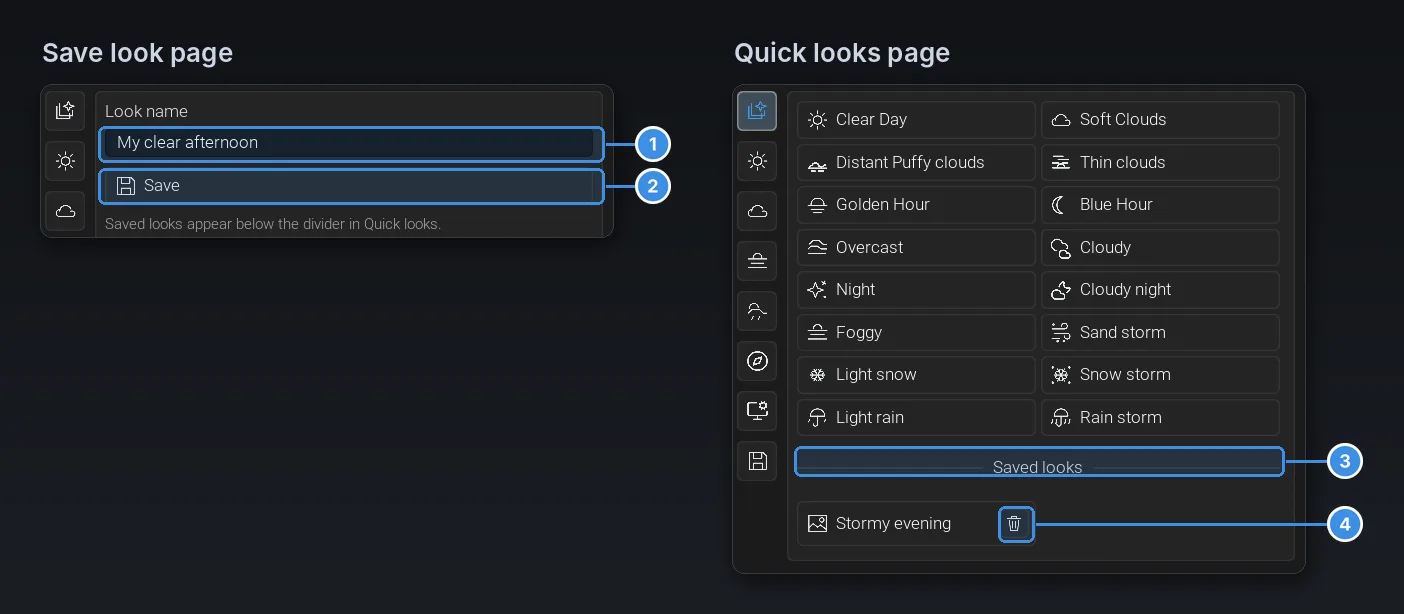
- On the Save look page, type a name.
- Click Save. The look is stored as a Data Asset in Content/RealtimeSkyBuilder/SavedLooks.
- Your look appears in Quick looks under Saved looks. Click it to apply it again.
- The bin icon deletes a saved look after you confirm.
A look stores appearance only. Save the level as well to keep the rigs and where they are placed.
In your own project#
Open your level, run the Studio and click Build sky. Then pick a look and adjust it as above.
Ground that reacts to weather. Surface weather is opt-in per material. Connect MF_RSB_WeatherSurface between your material’s inputs and its outputs; it reads the values the Sky Rig writes to MPC_RSB_Weather.
- Snow depth displaces the ground with Nanite tessellation. Set r.Nanite.Tessellation=1 in your project’s DefaultEngine.ini (the demo project already does), and keep tessellated triangles under about 150 m.
- Shading model. Don’t use Subsurface on materials that use the weather function.
- No cover yet. Ground under a roof still gets wet or snowed on, even though particles stop at the roof.
Sequencer and Blueprints. Key Absolute time (clouds) and Time of day for repeatable shots, and turn off Animate clouds in Play while you do. From Blueprints, call ApplyLook(Look, BlendSeconds) on the Sky Rig to switch looks.
Tips and troubleshooting#
| If you see this | Do this |
|---|---|
| The sky doesn’t change while you edit | Turn on Realtime in the viewport |
| No rain or snow in the viewport | Turn on Enable particles, keep the Studio open, and check that a Weather Rig is linked |
| The picture is too dark or bright for a moment after a day/night switch | Auto exposure is adapting. Turn on Use sky exposure for a fixed, instant exposure |
| The ground doesn’t get wet or snowy | Turn on Surface weather, and add MF_RSB_WeatherSurface to the ground material |
| Rain falls through a thin roof | Cover comes from the distance field; very thin geometry (under about 20 cm) may not block it |
| A saved look didn’t bring back the rigs’ placement | Looks store appearance only. Save the level too |